Oracle VirtualBox is a very good application for beginners to use when starting off in their networking skills. For most people this will seem a daunting task but if you follow this step by step guide you should be able to create your own Local Area Network using Oracle VM.

Virtual Box Windows Installation

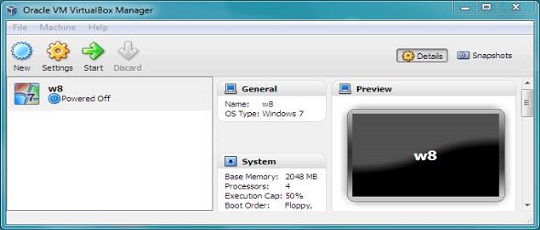
STEP 1: Open Oracle VM VirtualBox Manager / Create New Image (by clicking 'NEW')

STEP 2: Name Image and Select Type and Version of an OS, then click NEXT

STEP 3: Allocate Physical Memory to the Virtual Machine, click NEXT

STEP 4: To Create a New Virtual Hard Disk Insure 'Create a Virtual Hard Drive' option is ticked, click CREATE

STEP 5: Leave Hard Drive File Type as VDI, click NEXT

STEP 6: Leave Storage on Physical Hard Drive as 'DYNAMICALLY ALLOCATED', click NEXT

STEP 7: Chose how much Physical Storage will be allocated to the Virtual Machine, click on CREATE

STEP 8: Double Click on newly created Virtual Machine

STEP 9: Select a Path to Windows Installation Image File

STEP 10: Select desired Image File, click OPEN

STEP 11: Click START to begin Windows Installation

STEP 12: After you see the Windows Installation Screen, Select Language, Time & Keyboard Output, Click NEXT

STEP 13: Select 'INSTALL NOW'

STEP 14: Select Operating System Version you want to install, click NEXT

STEP 15: Chose the 'CUSTOM (ADVANCED)' from the Installation Type Options

STEP 16: Select the Drive where you want to install the OS, click NEXT

STEP 17: Allow Time for Windows to Install

STEP 18: Allow Virtual Machine to reboot (or Select 'RESTART NOW')

STEP 19: After rebooting, create a new user password by clicking on 'OK'

STEP 20: Enter the new password and confirm by pressing ENTER

Congratulations! You are now ready to continue with the network configuration.
Fig. 1

Fig.2

Fig.3

Fig.4

Fig.5

Fig.6

Network Configuration Procedure
We are setting up networks in Oracle Box in a virtualized environment. We have four virtual machines set up to configure our network. We began by applying settings for each machine in Oracle box.
Fig. 1

In the Virtual box manager we right-click on the virtual machine we wish to edit and select settings. In the settings menu we select networks, check enable the network adapter and change our adapters to Internal networks (and select Intnet from the dropdown) to properly create a network in our virtual environment. We repeat this process for each virtual machine we want to include in our network. For our router we select two adapters so different networks can communicate with each other.
Fig.2

Fig.3

In our virtual environment we find our way to the adapter settings in Control Panel>Network &Sharing Centre>Change adapter settings. We right click on the adapter we wish to alter and select Properties. We then click on Internet Protocol version 4 (TCP/IPv4) and select the Properties again. We select Static IP address to avoid IP conflicts.
Fig.4

In our first network we are also changing the adapter settings to connect to our router. The IP address is 10.0.0.2 so that it is on the same network which corresponds to the adapter on
the router. The default gateway leads back to the router which is why it is 10.0.0.1.
Fig.5

In our second network we also must change our adapter settings to connect to the router. The Ip address also corresponds to the network the router is on which I why it is 192.168.0.2. The default gateway is the address which leads back to the router.
Fig.6

This network is connected to the router to provide a DHCP Relay for the DHCP Server on the Tallaght server can communicate with the Dublin network. This will be covered later.
Authors: Jacob, Anthony, Alan, Noel.
Setting up Routing and Remote Access
1 - In the image below you can see in Server Manager how to create a new Role.
Right click Roles and select Add Roles.

2 - After Add Role has been selected, tick the check box highlighted. Click next.

3 - In the Add Roles Wizard you want to select Network policy {Policy and Access Services and click next.

4 - Next in the Add Roles Wizard, You want to select Routing and Remote Access which is highlighted and click next.

5 - In this section of the wizard you want to click Install.

6 - After the installation, you want to right click the new server that appears under the Routing and Remote Access tab and select the Configure and enable Routing and Remote Access option.

7 - Click next in this wizard.

8 - Select Custom Configuration in this section of the wizard and select Next.

9 - In this part of the setup you want to be sure to select LAN routing and select Next.

10 - Click Finish to complete the Routing and Remote Access Server Setup.

11 - Start the Service after being prompted.

12 - This is the path to create the DHCP Relay Agent from the start button, select Administrative Tools and scroll to Routing and Remote Access and select it.

13 - Expand the server and IPv4 and select General and right-click New Routing Protocol.
And select DHCP Relay Agent.

14 - Here you will create a new interface for the DHCP Relay Agent and select connection to Dublin.

15 - In this section you need to configure the Properties in Connection to Dublin.

The highlighted areas will be set to 4 by default, make them 2 and 1 as shown.
16 - Again right-click the DHCP Relay Agent properties and type in the IP address of the DHCP server as shown, click Apply and OK.

Now you have just created a new Routing and Remote Access in your Server using DHCP Relay Agent.
And you are done!
No comments:
Post a Comment